DIY X-Y Plotter Design
| ✅ Paper Type: Free Essay | ✅ Subject: Engineering |
| ✅ Wordcount: 921 words | ✅ Published: 30 Aug 2017 |
Objective:
The design report includes the details about the process involved in building a DIY XY-plotter and programming the device to draw a square or a circle with precise dimensions and scale. The components and the design is made feasible to the budget available i.e., £100 GBP. The device is designed and built with accuracy to meet the given task by performing and validating the test required. In the final step of this project, the precision rate and accuracy is taken care to get the necessary output.
Introduction:
A XY plotter is a two dimensional printing or writing machine with continuous lines in x and y axes. The pen held by the pen control moves in all possible directions such as forward and backwards, as well as sideways and diagonally over a flat surface. Each axis of the plotter is controlled by separate single stepper motor and railings, the pen is controlled by servo. The electricals are controlled and achieved by the controller which is lpc1768 and 12v power supply.
In this project, the machine has been designed to draw a square or a circle on a A5 drawing bed given, depending on the configuration selected. This project should meet specific requirements. Some of the constraints to take into account are the material provided, which is acrylic, the controller to be used, which is the mbed lpc1768, and a felt tip pen and the sensor, which is solenoid. Not to mention, the overall budget should limit an amount of £100GBP.
XY movement mechanism:
The plotter has two axes control and involves movement of the pen in x and y axis. Each axis of the plotter is controlled by single stepper motor, which is NEMA stepper motor 17. The design involves the A5 bed with the dimension 300mm in length and 180mm in width which moves in the direction forward and backwards using single stepper motor on edge of the sliding bed. The pen is controlled by servo and the conveyer holding the pen is moved in the direction left and right using the stepper motor placed attached to the gears at the back end of the plotter. The design is expected to be plotted on the A5 sheet of dimension 250mm in length and 150mm in width. The pen can also be controlled by solenoid for continuous movement of the pen on the A5 bed, due to the feasibility and availability servo is replaced by solenoid in the project.
The basic idea of the plotter design is shown below.

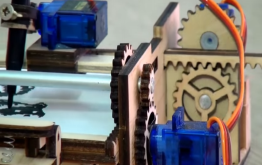
1a. The front view of the design 1b. The position of the stepper motor for A5 bed control.
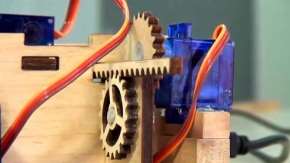
1c. The position of the stepper motor for conveyer control.
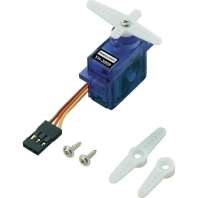
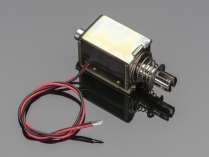
2. The servo to control pen 3. The solenoid
LIST OF THE COMPONENTS AND ITS COST
|
Components required |
Cost per piece(approx.) |
|
Mbed lpc1768 controller |
£40 |
|
NEMA stepper motor 17(2 no) |
£8 |
|
Stepper motor driver DRV 8825(2 no) |
£7 |
|
Bread board |
£2 |
|
Acrylic sheet |
£15 |
|
Solenoid |
£23 |
|
Total |
£95 |
Resource usage plan:
|
Week no: |
29 |
30 |
31 |
32 |
33 |
34 |
35 |
36 |
37 |
38 |
39 |
|
Laser CAM software |
|||||||||||
|
Mechanical platform development(building x-y axes) |
|||||||||||
|
Mechanical platform development(movement of pen and the railings) |
|||||||||||
|
Mechanical platform demo |
|||||||||||
|
Software development(motor movement) |
|||||||||||
|
Software development(plotting) |
|||||||||||
|
Software, electrical and mechanical demo |
|||||||||||
|
Final demo |
|||||||||||
|
Report preparation |
|||||||||||
|
Report submission |
Critical evaluation:
The challenges faced in this project are as follows
- The precision of the output, because the railings are replaced for linear bearing and screws the precision is expected to differ from the other x-y plotters.
- The positioning of the pen, the solenoid is made capable enough to sense the position of the pen and move to the desired position to start plotting.
- The movement of the pen for neat and clear plotting without any scribbling on the paper.
- The stability of the machine to sustain the power supply and railings.
Testing plan:
- The plotter is tested for the positioning of the pen and its control.
- The sensor is tested for any obstacle on the plotting surface.
- The evaluation of performance, as well as the precision rate and accuracy, not to forget the timing to plot the given design.
References and Bibliography:
- http://www.instructables.com/id/X-Y-Plotter
- http://www.planetarduino.org/?cat=501
- https://www.google.co.uk/imgres?imgurl=https%3A%2F%2Fi.ytimg.com%2Fvi%2FAlBPFC41FsM%2Fsddefault.jpg&imgrefurl=http%3A%2F%2Fwww.planetarduino.org%2F%3Fcat%3D501&docid=4vmP-FZ2mZej4M&tbnid=sDST5jp8d5VvOM%3A&vet=1&w=640&h=480&bih=651&biw=1366&q=electronic%20diagram%20of%20DIY%20Printing%20tiny%20images%20using%20Arduino%20Uno%20&ved=0ahUKEwi7qrDOrpDSAhVGHJAKHaGxB0gQMwg6KBUwFQ&iact=mrc&uact=8#h=480&imgrc=sDST5jp8d5VvOM:&vet=1&w=640
- https://en.wikipedia.org/wiki/X%E2%80%93Y_plotter
- https://www.google.co.uk/imgres?imgurl=http%3A%2F%2Fs.storage.akamai.coub.com%2Fget%2Fb57%2Fp%2Fcoub%2Fsimple%2Fcw_timeline_pic%2F5e202714dd0%2Fd6c91cf7036cb97f2e46f%2Fbig_1441790454_image.jpg&imgrefurl=http%3A%2F%2Fcoub.com%2Fview%2F82ma7&docid=6kkein0mM-O7BM&tbnid=e3QH-bglqz1ulM%3A&vet=1&w=1280&h=720&bih=651&biw=1366&q=DIY%20Printing%20tiny%20images%20using%20Arduino%20Uno%20&ved=0ahUKEwiY44OQsZDSAhVElJAKHbHzCJIQMwgaKAAwAA&iact=mrc&uact=8#h=720&imgrc=e3QH-bglqz1ulM:&vet=1&w=1280
- https://www.google.co.uk/imgres?imgurl=https%3A%2F%2Fhackadaycom.files.wordpress.com%2F2016%2F12%2Fscreenshot-2016-12-06-10-48-52.png%3Fw%3D800&imgrefurl=http%3A%2F%2Fhackaday.com%2F2016%2F12%2F12%2Fdiy-mini-printer-is-95-wood-prints-tiny-cute-images%2F&docid=iDfAJ95GWy7MeM&tbnid=IG6-g0DBQKyfgM%3A&vet=1&w=800&h=428&bih=651&biw=1366&q=DIY%20Printing%20tiny%20images%20using%20Arduino%20Uno%20&ved=0ahUKEwiY44OQsZDSAhVElJAKHbHzCJIQMwgcKAIwAg&iact=mrc&uact=8#h=428&imgrc=IG6-g0DBQKyfgM:&vet=1&w=800
- https://www.youtube.com/watch?v=AlBPFC41FsM
Cite This Work
To export a reference to this article please select a referencing stye below:
Related Services
View all


DMCA / Removal Request
If you are the original writer of this essay and no longer wish to have your work published on UKEssays.com then please click the following link to email our support team:
Request essay removal